

The bold, daisy-like blooms of echinacea can turn a sunny border into a living herbal pharmacy.
One well-planned echinacea patch can provide flowers and roots for years of teas, tinctures, and simple home remedies.
Echinacea (primarily Echinacea purpurea and Echinacea angustifolia) is a cornerstone perennial for home medicinal gardens. [1]
In this guide, you’ll learn how to grow echinacea from seed, including seed biology, starting methods, transplanting, ongoing care, harvesting, drying, and basic home uses.
Homemade herbal preparations are intended for general wellness and self-care, not as a replacement for medical diagnosis or treatment.
Gardeners who want to build a broader home herb garden may explore the Medicinal Garden Kit, which includes echinacea among its 10 medicinal herb seed varieties. [1]
Why Grow Echinacea in a Medicinal Garden?
Echinacea is a popular herb for home herbal medicine and ornamental gardens because the flowers are striking and the plant is long-lived.
The plant’s appeal goes beyond herbal preparation. You get purple-pink petals and prominent central cones, a long-lived perennial that returns each year, and a plant that attracts pollinators like bees and butterflies.
It’s also suitable for raised beds, borders, and pollinator gardens. I’ve watched bees spend entire mornings on my echinacea patches.
Growing your own echinacea gives you greater control over how it is grown. You get fresh access to flowers and roots when needed and the ability to harvest and dry plant parts in small batches.
There’s also a more meaningful connection between garden and daily wellness routine. It feels good to turn something you grew into a simple cup of tea.
Purple coneflower (Echinacea purpurea) is more commonly grown in home gardens and is relatively easier to establish. [1] Narrow-leaved coneflower (Echinacea angustifolia) is often preferred in traditional herbal preparations but can be slower to establish from seed.
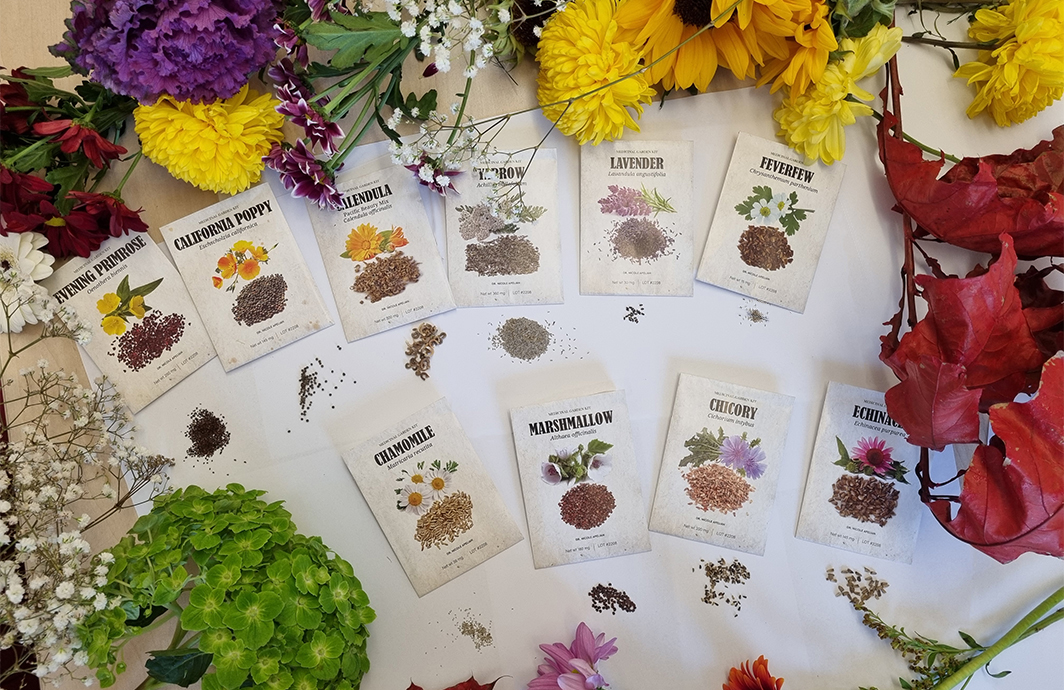
Echinacea is included in the Medicinal Garden Kit, alongside herbs such as calendula, chamomile, lavender, lemon balm, yarrow, feverfew, chicory, marshmallow, California poppy, and evening primrose. [1]
For a closer look at the seed collection, guide, and included herbs, read our full Medicinal Garden Kit review.
Understanding Echinacea Seeds: Germination and Stratification

Echinacea seeds have specific germination requirements that can frustrate beginners. They often require a period of cold, moist stratification to break dormancy. [1]
This mimics winter conditions in their native habitat. I learned this the hard way when my first batch barely sprouted.
For the refrigerator method, mix seeds with slightly damp sand or vermiculite, seal in a bag, and refrigerate for 4–8 weeks. For the outdoor method, sow seeds in fall and allow natural winter chilling.
Germination can be slow and uneven without stratification. Some sources report significantly improved germination rates after proper cold treatment. [1]
Store seeds in a cool, dry place in airtight containers. Label with species and harvest date. Use within 1–2 years for best results.
Sowing fresh seeds directly in spring without stratification often leads to poor germination. I wish I’d known this before wasting a whole packet.
The Medicinal Garden Kit includes echinacea seeds along with a guide that covers cultivation and home preparations. [1]
- Echinacea seeds need cold, moist stratification for best germination.
- Refrigerator method: mix with damp sand, seal, and chill 4–8 weeks.
- Outdoor method: sow in fall for natural winter stratification.
- Store seeds in cool, dry place; use within 1–2 years.
- Avoid sowing fresh seeds in spring without stratification.
When and How to Start Echinacea Seeds Indoors

Start stratified seeds indoors 8–10 weeks before the last expected frost. This gives seedlings a head start for the growing season.
Use seed-starting mix and small pots or cell trays. Sow stratified seeds shallowly, around ¼ inch deep. Water gently after planting.
Keep the soil lightly moist until seedlings emerge. Place trays in a bright window or under grow lights. Maintain moderate temperatures (around 65–75°F / 18–24°C) for germination.
Once seedlings have true leaves, thin or transplant to larger pots if needed. Harden seedlings off gradually before transplanting outdoors.
Avoid overwatering to prevent damping-off. Do not bury seeds too deeply. Label varieties and sowing dates.
I lost my first batch to overwatering. Lesson learned: less is more with moisture.
Gardeners beginning a larger medicinal herb bed can find echinacea seed packets within the Medicinal Garden Kit’s 10-herb assortment. [1]
- Start stratified seeds indoors 8–10 weeks before last frost.
- Sow seeds ¼ inch deep in seed-starting mix.
- Keep soil lightly moist and provide bright light.
- Maintain temperatures around 65–75°F for germination.
- Harden off seedlings before transplanting outdoors.
Direct Sowing Echinacea Seeds Outdoors

Fall sowing allows natural stratification over winter. Spring sowing should only be done with pre-stratified seeds.
Loosen and level the soil. Sow seeds shallowly, around ¼ inch deep. Water gently after planting.
Keep the soil lightly moist until seedlings emerge. Choose a sunny location with well-draining soil. Avoid areas that stay waterlogged in winter.
Thin seedlings to 12–18 inches apart once established. Healthy spacing leads to stronger plants and better airflow.
Mark sowing areas to avoid accidental disturbance. Protect young seedlings from heavy mulch or debris. Be patient; germination can be slow even with stratification.
I marked my spots with small stakes. Otherwise, I’d have forgotten where I planted.
A well-planned medicinal herb garden lets gardeners rotate through harvests of echinacea, chamomile, lavender, yarrow, and other herbs across the growing season. [1]
- Sow in fall for natural stratification or use pre-stratified seeds in spring.
- Plant seeds ¼ inch deep in loose, well-draining soil.
- Choose sunny locations; avoid waterlogged areas.
- Thin seedlings to 12–18 inches apart for healthy growth.
- Mark sowing areas and protect young seedlings.
Transplanting Echinacea Seedlings and Soil Preparation

Transplant after major frost risk has passed and soil has warmed. Harden off seedlings for 7–10 days before planting.
Dig a hole slightly larger than the root ball. Place the plant at the same soil level as in its pot. Water in well and mulch lightly.
Echinacea prefers well-draining, moderately fertile soil. Amend heavy clay with compost or coarse sand to improve drainage. Avoid overly rich soil, which may encourage leafy growth over flowers.
Space plants 12–18 inches apart to allow for mature size. Give each plant enough room to receive airflow and sunlight.
Plant echinacea in dedicated herb beds or pollinator borders. Add it near other medicinal herbs like yarrow, chamomile, and lavender. Grow a dedicated “immune support” bed with echinacea, elderberry (if space allows), and other traditional herbs.
The Medicinal Garden Kit provides seeds for a multi-herb “backyard pharmacy” concept and includes a guide with planting, harvesting, and remedy-making information. [1]
- Transplant after frost risk passes; harden off 7–10 days first.
- Plant at same soil level; water well and mulch lightly.
- Use well-draining, moderately fertile soil; amend clay if needed.
- Space plants 12–18 inches apart for mature growth.
- Plant in herb beds or pollinator borders with companion herbs.
Echinacea Plant Care: Watering, Feeding, and Maintenance

Echinacea is relatively low-maintenance once established. Water deeply when the top layer of soil begins to dry. Keep young plants consistently moist but not soggy.
Water at the soil line rather than constantly wetting foliage. This helps reduce issues like powdery mildew.
Avoid excessive nitrogen, which may encourage leafy growth over flowers. Use compost or a light balanced organic fertilizer if soil is poor. Do not overfeed established plants.
Deadhead spent flowers to encourage continued blooming (if desired). Leave some seed heads for wildlife and self-seeding. Remove any diseased or damaged foliage promptly.
Echinacea is cold-hardy and drought-tolerant once established. Mulch lightly to help retain soil moisture and moderate temperature.
Watch for aphids, Japanese beetles, powdery mildew, and root rot in poorly drained soil. Improve airflow and remove damaged foliage promptly. Use gentle, garden-appropriate pest management methods.
Echinacea can add color and pollinator appeal to a diverse herb garden, while the Medicinal Garden Kit also features pollinator-friendly herbs such as yarrow, lavender, chamomile, and lemon balm. [1]
- Water deeply when top soil is dry; keep young plants evenly moist.
- Avoid heavy nitrogen feeds; use compost if soil is poor.
- Deadhead for more blooms or leave seed heads for wildlife.
- Mulch lightly to retain moisture and moderate temperature.
- Watch for pests and disease; use gentle management methods.
When and How to Harvest Echinacea Flowers and Roots

Both echinacea flowers and roots are commonly harvested for home herbal preparations. Pick flowers when fully open but before petals start to drop. Harvest after morning dew has dried.
Choose a dry day whenever possible. Snip or pinch off individual flower heads with a small amount of stem. Use clean scissors or pruners.
Place flowers in a clean basket, tray, or paper bag. Regular picking encourages more blooms. Small, frequent harvests are easier to dry and process.
Harvest roots from mature plants (typically 3+ years old) in fall after foliage dies back. Use a garden fork to carefully lift the root mass.
Dirt, moisture, and damaged plant material can reduce the quality of the final dried herb. Dry plant material is generally preferred for tea and tinctures.
Gather healthy flowers or roots. Remove insects and visibly damaged material. Do not wash unless absolutely necessary; if washed, dry thoroughly.
Readers wanting an overview of the kit’s echinacea and companion herbs can visit the Medicinal Garden Kit review.
- Harvest flowers when fully open, before petals drop.
- Pick on dry days after dew has dried.
- Harvest roots from 3+ year-old plants in fall.
- Use clean tools and containers for harvesting.
- Remove damaged material and dry thoroughly before storage.
How to Dry Echinacea for Tea, Tinctures, and Remedies

Drying echinacea is a crucial step for tea and home remedies. It helps reduce excess moisture. It allows gardeners to preserve a seasonal harvest.
For air-drying flowers, spread flower heads in a single layer on a clean screen, rack, or paper-lined tray. Keep them in a warm, dry, shaded area with good airflow. Turn flowers occasionally for even drying.
For drying roots, wash thoroughly if needed, then chop into small pieces. Spread on screens or use a dehydrator on low heat. Ensure roots are completely dry before storage.
Flowers are dry when they feel crisp and papery. Roots should snap rather than bend. There is no sign of trapped moisture.
Store dried echinacea in an airtight glass jar. Keep it away from heat, humidity, and direct sunlight. Label the jar with the plant part and harvest date.
If plant parts smell musty, look discolored, or show mold, discard them. A well-planned medicinal herb garden lets gardeners rotate through harvests of echinacea, chamomile, lemon balm, yarrow, and other herbs across the growing season. [1]
- Air-dry flowers in single layer in warm, dry, shaded spot.
- Chop and dry roots on screens or in dehydrator on low.
- Flowers should be crisp; roots should snap when dry.
- Store in airtight glass jars away from heat and light.
- Discard any material that smells musty or shows mold.
Simple Echinacea Preparations for a Home Apothecary

Echinacea is a versatile herb for simple home preparations like tea, tinctures, and infusions. You’ll need fresh or dried echinacea flowers and/or roots, a clean teapot, mug, or infuser, and hot (not boiling) water for best flavor.
For the basic tea-making method, use 1–2 teaspoons of dried material or a small handful of fresh material per cup. Pour hot water over the plant material.
Steep for 10–15 minutes for roots, 5–10 minutes for flowers. Strain and enjoy plain or with a touch of honey. I like mine with a bit of honey in the evening.
For simple tincture ideas, try alcohol-based tinctures for long-term storage (following safe, standard ratios). Use dried or fresh roots and flowers according to traditional methods.
Use only dry plant material for storage and blends. Make small batches initially. Smell and inspect dried material before use.
Discard material that smells musty or shows signs of contamination. Patch-test new ingredients if using in skin-care projects.
Avoid using herbs if you have known plant allergies (especially to Asteraceae family plants); consult a qualified healthcare professional for health concerns. Keep dried herbs away from moisture to help preserve quality.
The product’s included Herbal Medicinal Guide is promoted as covering methods for turning its 10 herbs into preparations such as teas, infusions, tinctures, oils, salves, and poultices. [1]
- Use 1–2 teaspoons dried material per cup for tea.
- Steep roots 10–15 minutes, flowers 5–10 minutes.
- Strain and enjoy plain or with honey to taste.
- Consider alcohol-based tinctures for long-term storage.
- Store dried material in airtight containers away from moisture.
Build a Backyard Medicinal Garden with Echinacea

Expand from echinacea to a broader herbal-garden strategy for readers interested in long-term DIY wellness projects. Consider complementary herbs for a medicine-focused garden.
Echinacea for traditional immune-support preparations. Chamomile for calming teas and simple remedies. Lemon balm for citrusy, soothing infusions. Lavender for aromatic blends and relaxation. Yarrow for traditional herbal preparations.
Start with one or two easy plants. Add new herbs as confidence grows. Track planting, harvest, drying, and preparation dates in a garden journal.
Use windowsill pots for small starts. Try patio containers for renters. Raised beds work well for easier maintenance. Border planting creates a decorative but productive garden.
The garden becomes a renewable source of flowers and roots. Harvesting can become part of a calming outdoor routine. Excess dried herbs can be stored for later projects or homemade gifts.
The Medicinal Garden Kit includes echinacea and nine other medicinal-herb seed types, plus a guide presented as covering cultivation and home preparations. [1]
See whether the collection suits your garden goals in this detailed Medicinal Garden Kit review.
- Start with easy herbs like echinacea, chamomile, and lavender.
- Track planting and harvest dates in a simple garden journal.
- Use containers, raised beds, or border plantings to fit your space.
- Store excess dried herbs for future teas and homemade gifts.
- Consider curated seed kits for a diverse medicinal herb garden.
Conclusion
Learning how to grow echinacea from seed begins with understanding seed biology, proper stratification, and patient germination.
Choose the right echinacea species, stratify seeds properly, start seeds indoors or direct sow with care, transplant seedlings correctly, provide ongoing care and maintenance, harvest flowers and roots at the right time, and dry and store properly for home remedies.
You do not need a huge homestead or years of gardening experience. A sunny border, a packet of seeds, and a bit of patience can be enough to begin.
Readers ready to create a larger medicinal herb garden can explore the Medicinal Garden Kit and read the complete Medicinal Garden Kit review before choosing their seeds. [1]
Sources and Further Reading
- Medicinal Garden Kit – Product page with seed varieties and guide details. [1]
- Medicinal Garden Kit Review – In-depth review of the kit’s contents and features.
- Echinacea – Wikipedia – Botanical information and traditional uses.
- Mount Sinai Health Library – Echinacea – Overview of echinacea’s traditional herbal uses.
- University of Minnesota Extension – Growing Echinacea – Practical growing tips for home gardeners.